
TL;DR
Moving noise away from your workspace beats buying foam. Proper placement of panels, sealing gaps, and ventilation are key. A closet can become a decent studio with the right tweaks.
Ever tried recording vocals in a small closet and ended up with echoes, bass boom, and noise leaks? It’s frustrating. But here’s the truth: a closet can become a surprisingly effective sound booth—if you focus on the right tricks. This isn’t about slapping foam everywhere; it’s about smart placement, sealing gaps, and controlling heat and sound leakage.
In this guide, I’ll show you how to make your closet work for you. Whether you’re building a vocal booth or just trying to block noise, these tips will help you get professional results without turning your space into a construction zone.
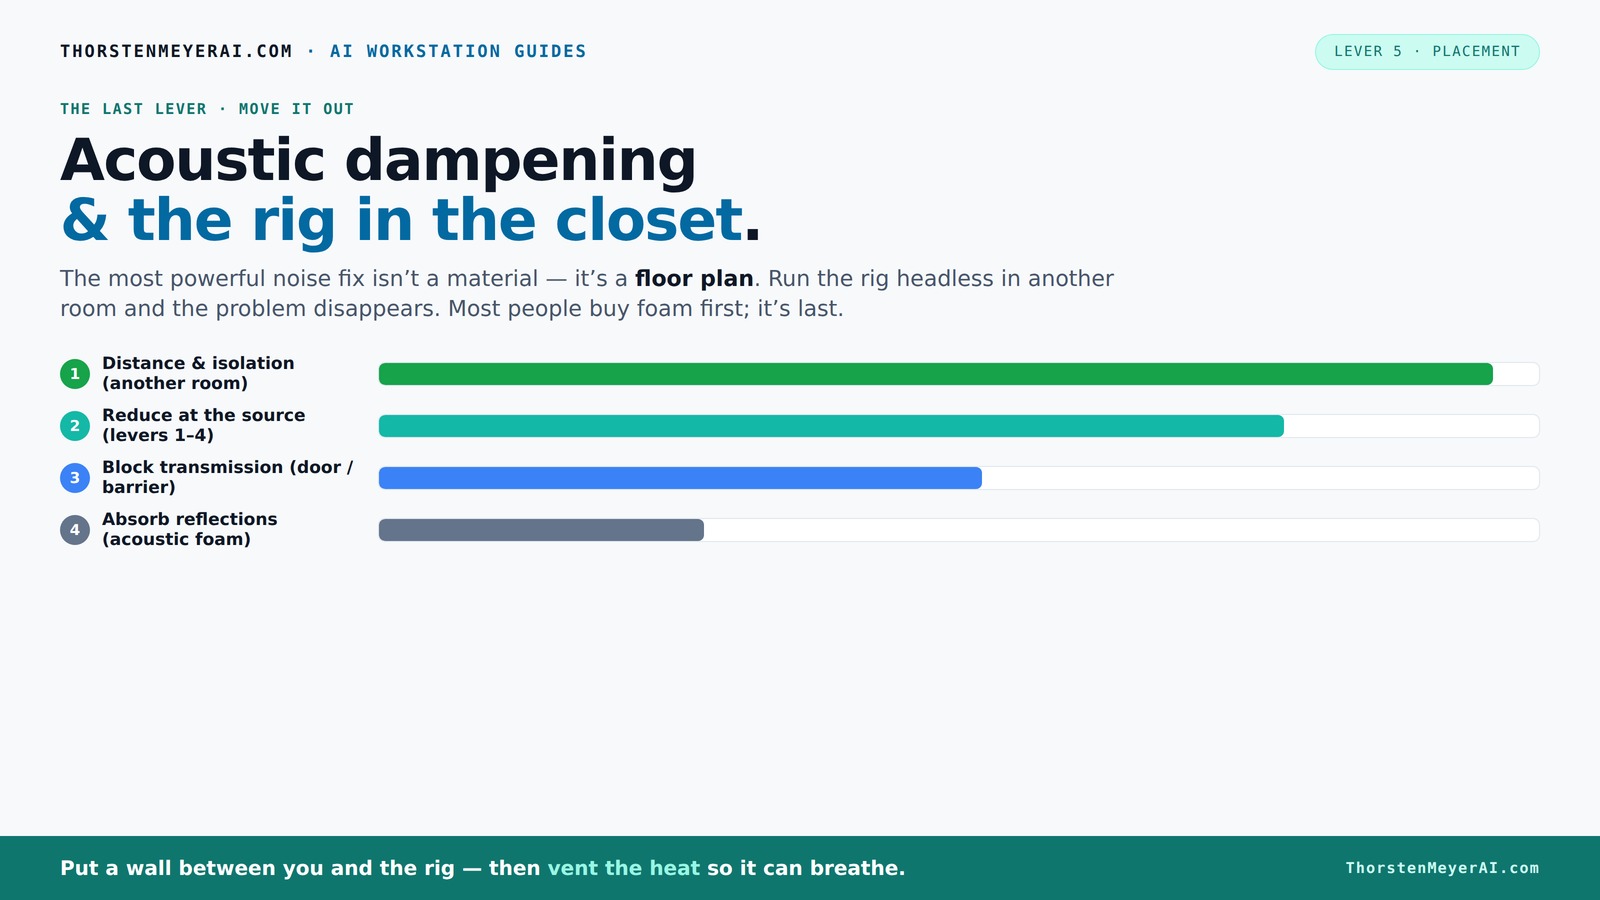
Acoustic dampening
& the rig in the closet.
The most powerful noise fix isn’t a material — it’s a floor plan. A rig you can’t hear because it’s in another room beats any amount of foam. Tap the approaches in Part 1 to see what actually works.
(another room)
(levers 1–4)
(door / barrier)
(acoustic foam)
Contain the noise, not the heat
Key Takeaways
- Sealing gaps and cracks with weatherstripping or acoustic sealant cuts noise leaks before adding panels.
- Placement of panels at reflection points on side walls and ceilings dramatically improves sound clarity.
- A closet can become a decent vocal booth with DIY soft materials, proper sealing, and targeted treatment.
- Bass traps in corners are essential for controlling low-frequency buildup in small spaces.
- Ventilation is critical—use exhaust fans or ducting to keep your rig cool and prevent overheating.

Focusound 52 Pack Acoustic Foam Panels 1" x 12" x 12" Sound Proof Foam Panles Soundproofing Noise Cancelling Wedge Panels for Home Office Recoding Studio with 300PCS Double-Side Adhesive
Soundproofing - Acoustic foam panels triangular grooves structure for better noise absorption, helps to reduce and absorb unwanted...
As an affiliate, we earn on qualifying purchases.
As an affiliate, we earn on qualifying purchases.
Soundproofing vs. Acoustic Treatment: What’s the Difference and Why It Matters
Soundproofing and acoustic treatment are often used interchangeably, but they do very different jobs. Soundproofing is about preventing sound from escaping or entering your space—think of it as a barrier that isolates noise, which involves adding mass, sealing gaps, and sometimes decoupling surfaces. Acoustic treatment, however, is about managing how sound behaves inside the room—reducing echoes, controlling reverberation, and improving clarity. This involves adding absorptive panels, diffusers, and bass traps.
Understanding this distinction helps you prioritize. For example, sealing gaps and adding mass can significantly reduce noise leaks, making your space more private. Meanwhile, installing absorption panels on reflection points will make your recordings clearer and more professional. The tradeoff is that soundproofing can be more invasive and costly, while acoustic treatment is more about optimizing the existing space. Combining both strategies yields the best results, but knowing which to focus on first can save time and money.

Portable Recording Booth for Home Studio, Foldable Sound Isolation Vocal Shield with Floor Stand, High-Density Acoustic Blanket Enclosure for Singing, Voiceover & Podcast, Includes Phone Holder
INSTANT STUDIO-QUALITY "DRY" SOUND: Transform any noisy room into a professional vocal booth instantly. Engineered with high-density acoustic...
As an affiliate, we earn on qualifying purchases.
As an affiliate, we earn on qualifying purchases.
Where to Place Acoustic Panels in a Closet for Maximum Effect
Placement is the key to effective acoustic treatment. The goal is to target the primary reflection points—areas where sound bounces directly into your microphone or ears, causing echo and muddiness. Learn more about acoustic placement. Using a mirror trick—standing in your usual recording spot and holding a small mirror against the walls—lets you identify these points visually. The mirror will reflect the surfaces that catch sound waves traveling toward your microphone, revealing exactly where to place panels.
By treating these reflection points, you prevent sound from bouncing directly into your mic, which results in cleaner recordings. Covering side walls at these spots reduces flutter echoes, while panels behind your microphone prevent rear reflections. The ceiling above your head is also a critical reflection point—especially in a small, enclosed space. For bass frequencies, which are less directional, installing bass traps in the corners is essential. These traps absorb the low-end energy that tends to build up in small, enclosed spaces, preventing a boomy or muddy sound that can obscure vocals and instruments. The tradeoff is that over-treating can make the space sound dead or unnatural; finding a balance is key.

WANJAO 100g Acoustical Sealant, Acoustic Caulk Acoustical Caulk High-Efficiency Sound Insulation Strong Adhesion Durability for Sound Insulation of Gaps in Ceilings Door Walls Floors Window
High-Efficiency Sound Insulation: This WANJAO acoustic sealant is specifically designed to reduce sound transmission. By filling gaps, it...
As an affiliate, we earn on qualifying purchases.
As an affiliate, we earn on qualifying purchases.
How to Build a Budget-Friendly Closet Vocal Booth That Works
Transforming a closet into a functional vocal booth doesn’t require expensive gear. The first step is sealing gaps—use weatherstripping around the door frame, add draft stoppers, and caulk any cracks to prevent sound leaks. These steps are fundamental because even small gaps can let in noise or cause sound to escape, undermining your efforts. Once sealed, soft materials like thick blankets, moving quilts, or even heavy curtains can be hung on the door and walls. These absorb sound and reduce reflections, making your recordings cleaner.
Next, place a few foam panels at the identified reflection points. These panels absorb mid and high frequencies but are less effective with bass. To handle low frequencies, consider adding bass traps—these are thicker panels placed in the corners where low-frequency energy tends to concentrate. DIY options such as rolled-up towels or dense mineral wool wrapped in fabric can serve as effective bass traps at a fraction of the cost. Additionally, using a portable reflection filter around your mic can further improve sound quality by blocking rear reflections. The key is to combine these low-cost, DIY solutions with strategic placement for maximum effect, creating a space that’s both affordable and functional for home recording.
Focusound 52 Pack Acoustic Foam Panels 1" x 12" x 12" Sound Proof Foam Panles Soundproofing Noise Cancelling Wedge Panels for Home Office Recoding Studio with 300PCS Double-Side Adhesive
Soundproofing - Acoustic foam panels triangular grooves structure for better noise absorption, helps to reduce and absorb unwanted...
As an affiliate, we earn on qualifying purchases.
As an affiliate, we earn on qualifying purchases.
Controlling Bass Buildup and Boom in Small Closets
Bass frequencies tend to accumulate in small, enclosed spaces, creating a muddy or boomy sound that masks clarity. This is because low-frequency sound waves are longer and less directional, making them more prone to bouncing around and building up in corners. To combat this, installing bass traps in the corners is essential. These traps are dense, thick panels—typically 4 to 6 inches thick—that absorb low-end energy before it reverberates back into the room. DIY options include dense foam, mineral wool, or fiberglass wrapped in fabric, which can be customized to fit your budget.
Proper placement of bass traps in the corners where two or more surfaces meet can reduce low-frequency buildup by up to 80%. This prevents your recordings from sounding boomy or muffled, allowing vocals and instruments to come through clearly. Learn more about bass trap placement. Keep in mind that over-treating with bass traps can make the room sound unnaturally dead; instead, aim for a balance that reduces mud while maintaining some liveliness. Recognizing the low-frequency problem and addressing it with targeted treatment is a game changer for small space acoustics.
Ventilation and Heat Management for a Closet Rig
Adding a powerful PC or GPU to your closet setup can generate substantial heat, risking overheating and hardware failure. The challenge is to keep the space cool without compromising soundproofing. Find tips on ventilation and heat management. Active ventilation is the solution—install a quiet exhaust fan that pulls hot air out of the closet, paired with intake vents that bring in cooler air from outside. This creates a continuous airflow that prevents heat buildup while maintaining a controlled environment.
Sealing the space tightly without ventilation can trap heat, leading to thermal issues and potential hardware damage. Using ducted fans and vent grates allows you to balance sound isolation with effective cooling. Proper airflow not only extends your equipment’s lifespan but also prevents thermal noise—fans running at high speeds to cool the hardware can introduce unwanted noise, so choosing quiet fans and positioning them strategically is crucial. The tradeoff is that insufficient ventilation can cause overheating, but over-ventilating can compromise soundproofing; the goal is a balanced approach that ensures both thermal stability and acoustic integrity.
The Secret to a Quiet, Cool Closet Rig: Combining Strategies
The best results come from integrating multiple strategies. Start by sealing gaps and cracks—use weatherstripping, acoustic sealant, or draft stoppers to prevent sound leaks. Next, add absorption panels at reflection points to tame echoes and improve clarity. Finally, incorporate ventilation solutions—install quiet exhaust fans or ducting to ensure your equipment stays cool without compromising sound isolation. This layered approach addresses the different challenges simultaneously, resulting in a space that’s acoustically controlled and thermally stable.
Imagine a closet where your vocals sound professional, free of echo, and your PC runs cool without noise. Combining these methods—sealing, treatment, and ventilation—creates a balanced environment that supports high-quality recording and reliable operation. The tradeoff is that focusing on just one aspect might leave issues unresolved; a holistic approach ensures that you don’t sacrifice sound quality for cooling, or vice versa. It’s this synergy that transforms a simple closet into a functional, professional-grade studio environment.
Frequently Asked Questions
Can a closet really work as a vocal booth?
Yes, if you seal gaps, add soft treatments, and control low frequencies, a closet can be a surprisingly good vocal booth—especially for home recordings and streaming.What’s the difference between acoustic dampening, soundproofing, and acoustic treatment?
Acoustic dampening reduces echoes and reflections inside a space. Soundproofing blocks sound from leaking out or coming in. Acoustic treatment improves sound quality and clarity within the room. Combining them is ideal.Where should I place panels in a closet?
Focus on reflection points—use a mirror to find where sound bounces into your mic or ears. Cover those spots on walls, ceiling, and behind your mic for best results.Do bass traps matter in a small closet?
Absolutely. Bass traps in corners absorb low-frequency buildup, preventing a boomy, muddy sound and improving overall clarity.How many panels do I need?
It depends on your space and goals, but generally 4-8 panels covering reflection points and corners provide a good starting point.Conclusion
Turning a closet into an effective recording space isn’t about slapping on foam and calling it a day. It’s about strategic sealing, smart placement, and managing heat. When done right, your closet becomes a quiet, controlled environment where your voice shines and your gear stays cool.
Remember: the key isn’t just soundproofing or treatment alone. It’s combining those tactics with proper ventilation and placement. Your perfect closet studio is just a few smart tweaks away—and it’s easier than you think to make it work.